Experimentation is an incredibly important part of any project. It shows the examiner that we are willing to take risks and try out a variety of possibilities before narrowing down our ideas. At home you have already been experimenting with how reflections and plastic can distort your subject. At school you have experimented with digital editing techniques to create a glitch effect on your photographs.
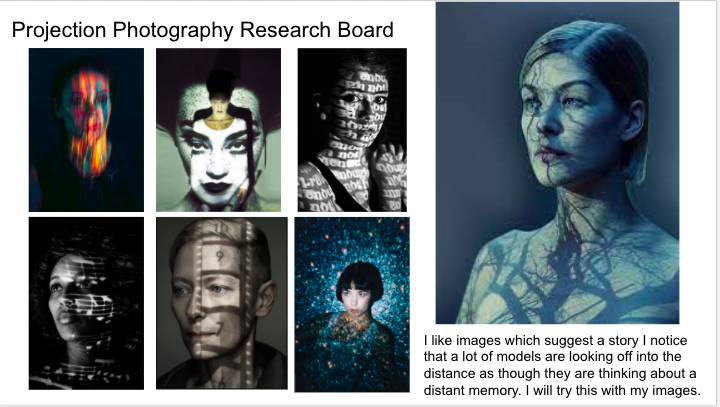
Over your upcoming lessons, you will prepare to undertake a shoot experimenting with projection photography. Before you begin, it is important to research what good projection photography looks like so that you can create the best outcomes possible. This will give you ideas of how projection photographs are composed and which images can be projected onto your model.
Task 1: a) Add a title of 'Projection photography research' underneath your Layout research b) Download 8+ images of projection photography to your computer & either upload them straight onto to your site or add them to a Google Slide presentation to create a mood board. Remember that you must download your work as a jpeg and upload the image to your site if you use Google Slides. d) Add a text box underneath your mood board and explain/annotate what is interesting about at least 2 of the images in a couple of sentences on your page. You can use one or more of the sentence starters below to help you: The projection photographs I find most interesting are...because... In order to recreate this style in my own photographs I will need to... because... I could make this style fit in with my chosen genre of music by...
Lesson 2
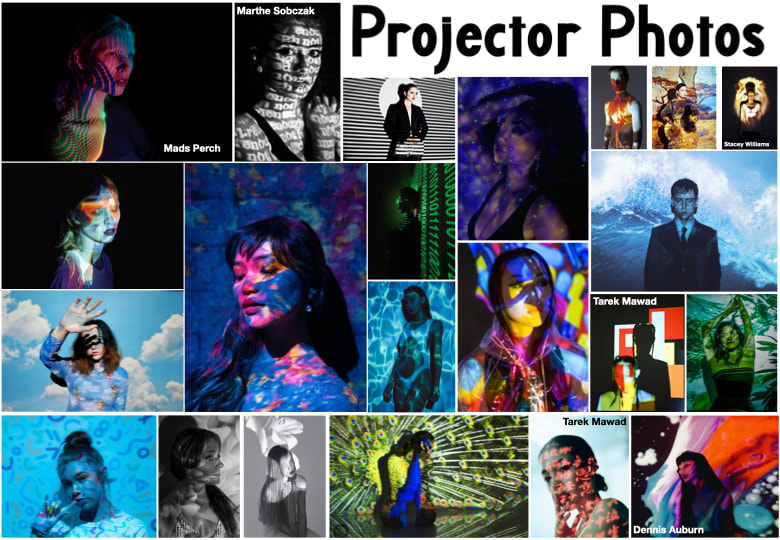
Having researched found examples of projection photography, it is time to gather the images which you will use to project.
Task 1: Using your projection photography mood board to help you, find (or create) suitable images to use in your own projection experiments: Green (grade 1-3) 8 images Amber (grade 4-5) 12 images which relate to your music genre Red (grades 6+) 16 images which have enough light areas so you will see a face when you project.
Place them onto a Google Slide ready to use when you take your photos one slide per image. If you have completed the Abstract Photography shoot at home, these will be fantastic to project on to your model, so be sure to include your best images as options for projecting. Ensure that: - When looking for images online, find 'large'* images so that when you project them they will be sharp an not pixelated. *To find large images which will look sharp when enlarged on the projector - Go to google images - click on tools - click size - click large - Think about your music genre and what kind of images might be suitable. Looking at my mood board above I might include images which have musical notes, winter trees, text (perhaps a poem or word - it could even be the name of the album). - Choose bold, striking images which will create interesting projection images like my two examples below:
Later Lessons - Completing your Projections
Task 1: a) Go into the dark room with your partner and a laptop. b) Log in to your Google Drive and access the Slide which you created with the photos you need to project. c) Plug your laptop into the projector so that your Google Slide is projected onto the wall/backdrop. d) Focus the projector and ensure that it is far enough away from the wall so that you can have a clear image on your model's face/body.
Green (grade 1-3) Take 8 photographs of your model with each photograph using a different projection. Move and direct your model so that they are in the best place for the projected image.
Amber (grade 4-5) Take 12 photographs of your model. Move and direct your model so that they are in the best place for the projected image. Use images which link to the theme and your music genre.
Red (grades 6+) Take 16+ photographs of your model. Move and direct your model so that they are in the best place for the projected image. Use images which link to the theme and your music genre. Use compositional guidelines like simplicity, dramatic angles/ rule of thirds to make your portrait more successful/interesting.
Task 2: a) Add a title underneath your Projection mood board of 'Projection Photography Experiments'. b) Create a new folder in your Photography folder in your Google Drive with the title 'Projection Photography Experiments' and upload your photos to that folder. c) Upload your photographs to your site in rows of four. Screenshot your contact sheet, delete the individual images & upload your screenshot. If you completed the red task during your last lesson then try to be selective with the photographs which you choose to include. You should have at least 12 photos in total, but they should be your very best ones.
Task 3: Green /Amber Underneath your contact sheet write a brief sentence explaining which projection images you think worked best. You can use the sentence starters below to help you: I found a number of different found images to use in this projection photo shoot. When choosing the images I ... I think that the ..... worked best because... I think that I could have improved the shoot by...
Red (grades 6+) Complete a reflection of your photo shoot answering the following questions in full sentences: How did you experiment with the projection images? What worked the best? What effect did you achieve when you changed the distance between the model and the projection? What could you do differently to make your outcomes more successful? How will you improve your shoot next time?
Task 4: Underneath your contact sheet and evaluation of your shoot add a title of 'Editing Projection Photos'.
Task 5: Green (grade 1-3) Edit two of your favourite photos using Affinity (or other digital manipulation software) a) First crop and remove any distracting elements from the background. b) Then edit to subtly enhance your images. You might like to try a combination of the following: - Desaturate your colours (make it black and white) - Enhance brightness and contrast - Enhance lighting and shadows (eg. curves or filters: render - lighting.) c) Complete a mini outcome with your best edited projection photo by cropping it into to a square shape and adding text (title of album and artist name).
Amber (grade 4-5) Edit two of your favourite photos using Affinity (or other digital manipulation software) a) First crop and remove any distracting elements from the background. b) Then edit one of your images to subtly enhance it. You might like to try a combination of the following: - Desaturate your colours (make it black and white) - Enhance brightness and contrast - Enhance lighting and shadows (eg. curves or filters: render - lighting.) c) Try out a different digital editing technique on your other image - glitch, double exposure, selective colour changing etc. d) Create a mini outcome with your best edited projection photo by cropping it into to a square shape and adding text (title of album and artist name).
Red (grades 6+) Edit three of your favourite photos using Affinity: a) First crop and remove any distracting elements from the background. b) Then edit one of your images to subtly enhance it. You might like to try a combination of the following: - Desaturate your colours (make it black and white) - Enhance brightness and contrast - Enhance lighting and shadows (eg. curves or filters: render - lighting.) c) Try out a different digital editing technique on your other two images - glitch, double exposure, selective colour changing etc. d) Create two mini outcomes with your best edited projection photos by cropping them into to a square shape and adding text (title of album and artist name).
Task 6: Save your edited photos as JPEGs then upload to your site under the title of 'Projection Edits' so your photos are large and show off your skills. Task 7: Write a few sentences to review your photo shoot and edited photos. Put this underneath your edited photos. (Green/Amber) Use some/all of the sentence starters below as a guide (these can be adjusted): I think my most interesting edited photo is ...because... I cropped my photo in order to remove... I think I improved my original photo by... I also like my second/third photo because... I used a combination of ...adjustment layer and... I think in my next photo shoot I will... In my next photoshoot I will improve my photos by...
Red As above (using your own words) and: - What are the strengths of your edited photos and why? - How could you develop these photos in a new and original way? What aspect would you keep and what would you change to improve them.