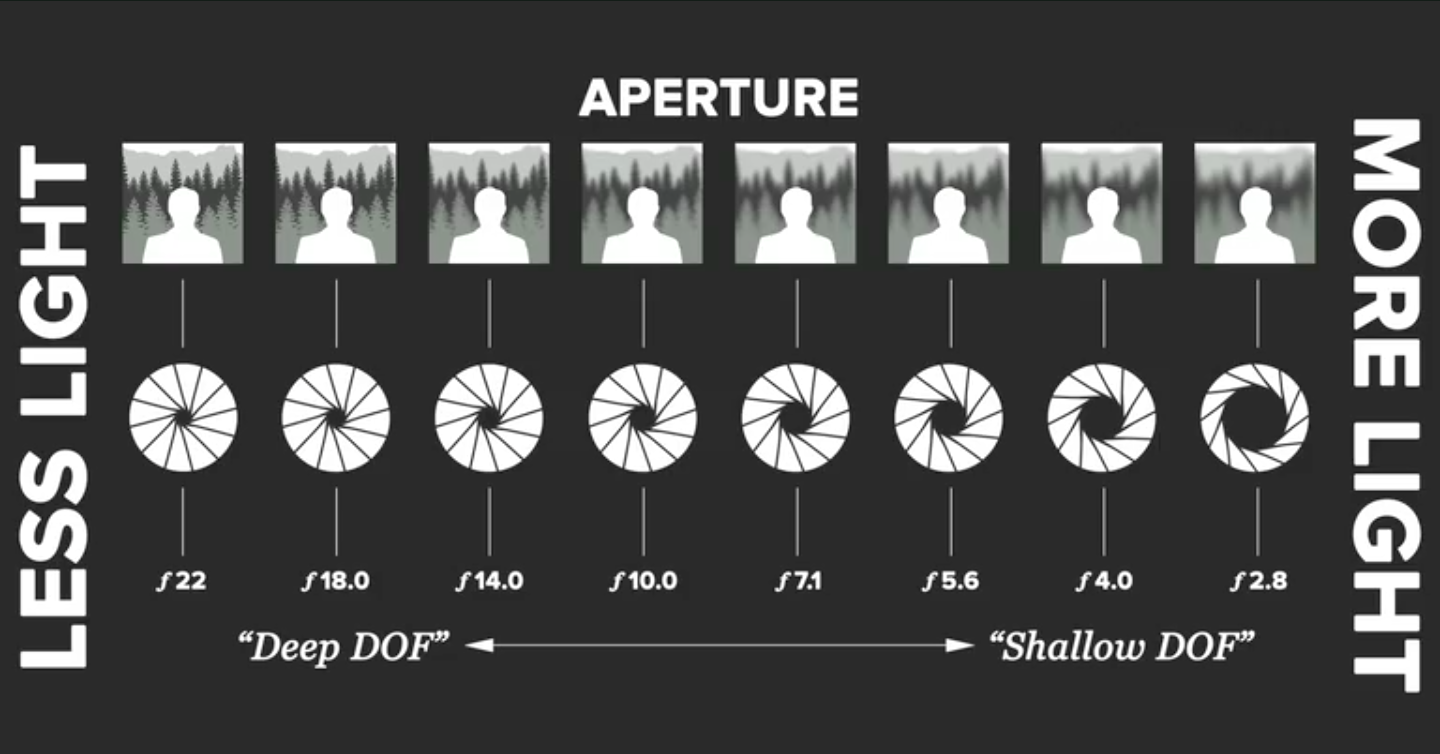
Having previously researched and responded to the work of two photographers who explore your chosen theme, exploring the work of a third artist can help you to ensure that your work is original and not overly derivative when you come to develop your own ideas.
It is important to choose a third artist whose work relates to the ones you have previously studied in an organic way so that you own ideas can develop organically. Take a look at the pupil example below for inspiration regarding how your artist research might influence the ideas you develop later on in your project:
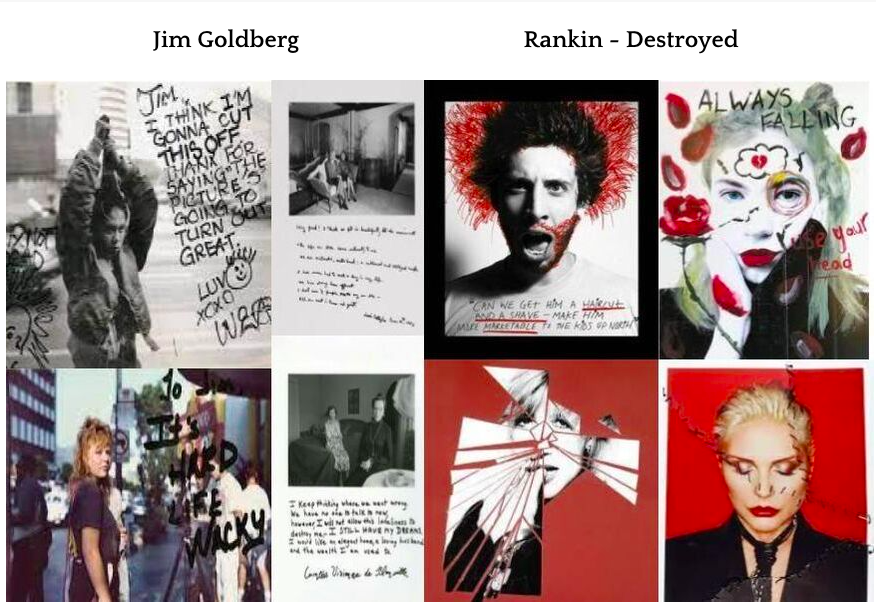
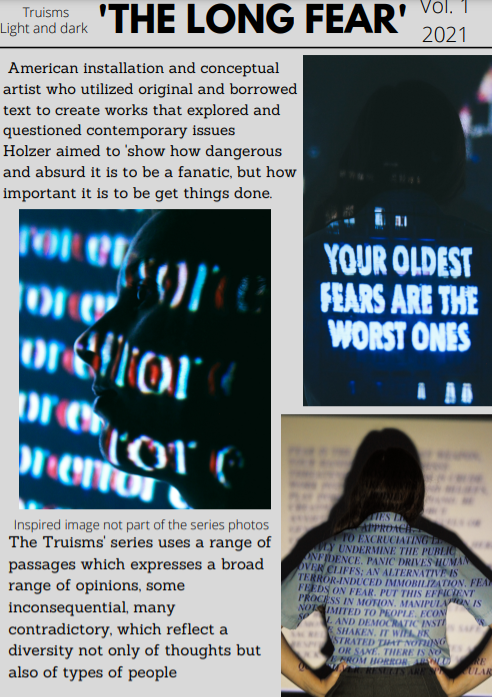
This pupil's work explores the theme of Light and Dark with a focus on how photographers use text in their work. The first two artists they researched were Jim Goldberg and Rankin.
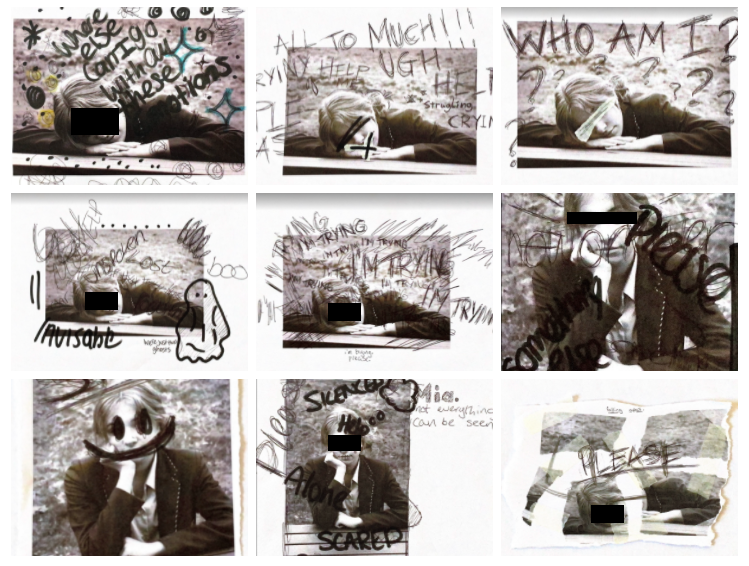
They responded to their chosen artists' work by asking their model to hand write (in the style of Jim Goldberg) over photographs which the pupil had taken of them (much like Rankin did in his series 'Destroy').
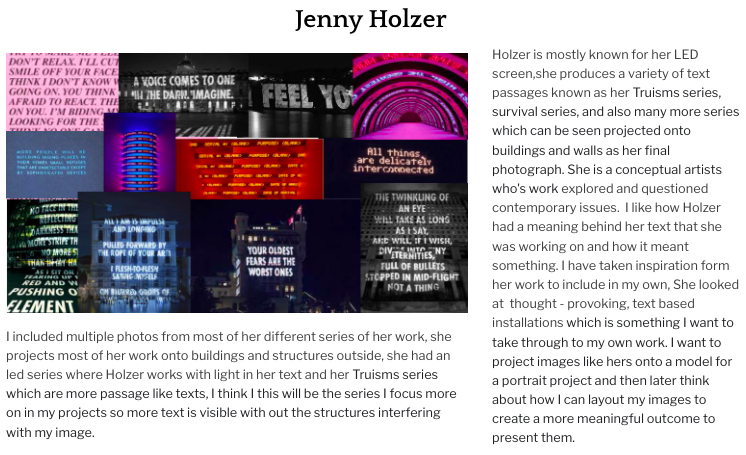
The third artist they chose to explore was Jenny Holzer. Holzer uses text in her work, much like the previous artists but projects the text rather than writing by hand.
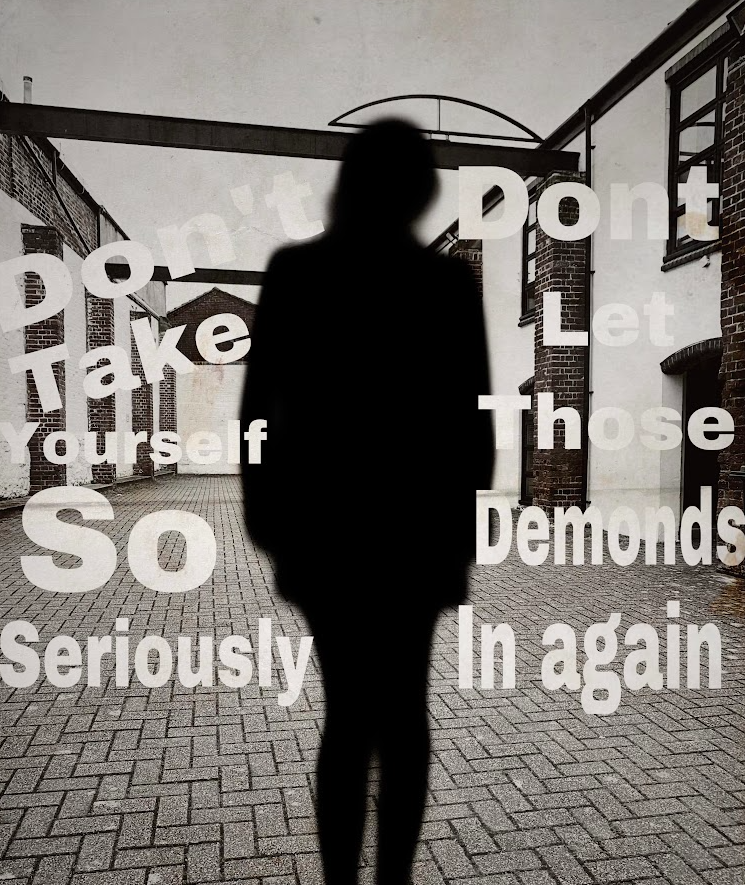
Pupil response to Jenny Holzer.
Idea 1 - Combining projections (Holzer) with digital text.
Idea 2 - Adding statements given by the model (Rankin) digitally (Holzer) over the background of the image (Goldberg).
Idea 3 - Taking a photograph of their model, creasing it (Rankin) and adding text over the image (Goldberg and Holzer)
Task 1: Take a look at your mood board from earlier in the project to help you decide on which artist you should research. Top tip - try to pick an artist whose subject matter, editing techniques, use of light etc. compliments the work you have previously researched so that you will be able to come up with ideas which are inspired by all of them easily. See the link below for a list of possible techniques you could pick from and consider how each technique could compliment the work of the artists you have already researched:
Task 2: a) Add a spacer and a divider under your previous work. b) Add a title '(the name of your artist) Research Page' in bold.
Task 3: Write a paragraph about the work of your chosen photographers to anaylse the way they photograph your chosen subject. You should include: - 3 photographs of their figure photographs (not photos of the artist!). - key information about their work from the things you have read about (not the photographer but the work itself) - Your own observations of the photography techniques and formal elements that you see - eg. how does the photographer use composition, lighting, Formal Elements like line, shape and texture, Principles of Design like balance, contrast and movement etc? - What you think the work is about - what does the photographer want you to think about? What might the meaning behind the work be? - Your opinion and explanation of how you will take inspiration from their work.
Green (grade 1-3) a) Find at least 3 images by your chosen photographer which relate to your theme. b) Add your three photos underneath your title. Resize your photos so that they are of equal sizes beside each other. c) Write a paragraph about the work - If you need help getting started, copy and paste these sentences below your 3 images and fill in the gaps. The photographer I have chosen is... Having read about their photography, I have learnt that... When I look at _____'s photographs, I can see... I like the photographers use of … (rule of thirds, leading lines, unusual angles, contrast, interesting lighting.) Three words I would use to describe the style of work would be... One of the reasons that I have chosen this photographer to inspire my work is because I like ... Amber (grade 4-5) Green + Read the example of Rachel Baran above or Julian Opie below to help with what to write. Include information about Formal Elements, Lighting, Principles of Design and/or Compositional Guidelines Something else I like about the artwork is… I think the artist was influenced by... I will use the ideas/techniques (of…) in my own work by... I will take inspiration from ____'s work by...
Red (grades 6+) Amber + Use the guides and questions below to help you analyse your chosen artist's work, remember to include a detailed analysis of at least one of the photographs.
TIP - your writing must be in your own words, if you copy and paste from the internet then your work could be picked up for copyright infringement and your coursework could be discounted for the exam.
Lesson 2
Now that you have researched the work of your chosen artist you need to respond to their work by taking photographs. If you go on a shoot without having properly planned the photographs you plan to take you might not take the most successful photographs. You need to spend some time thinking about all the possibilities in terms of the equipment you'll need, the location you'll need to go to and what could potentially go wrong during your shoot. In other words, you need to create a photoshoot plan.
Task 1: Create a single slide on Powerpoint or work directly onto your site using text boxes and images underneath the title 'Artist's Name Photoshoot Plan'. Make notes and add pictures to inspire you. You may use the sentence starters/sheets below or the template that I have created and add your own information into it.
Green (grade 1-3) Copy and paste and finish these sentences: • I will do the photoshoot…… (where and when) because… • The props I will need for this shoot are… • The camera angles I will use are…because… • The lighting will come from… which will give me a mood of… • My plans link to the photographer I have researched because....
Amber(4-5) Use the sentence starters below as a starting point and add more that are relevant to your shoot. Links to photographer Before my shoot I investigated the artist… What I really like about the work is… From looking at this work I would like to incorporate… Equipment/Location For my shoot I will need… The location/s I want to use for this shoot are… Lighting I plan to take my photos at…because…. I will need to use.. to create…lighting Models For this shoot I will need…. My models will wear/ or will be styled by… The props I will need are… Composition For my shoot I will try using… (rule of thirds, leading lines, framing etc). I will also try to use… Camera Settings I will use..camera angle (high, low, unusual). I will use a…shutter speed because I will use a …(narrow or wide depth) of field because.. Idea For this shoot I would like to try and capture…. My idea behind this shoot is to… Red 6+ Use the handout below and answer all the questions.
Going for Gold You get extra marks for including sketches of how you would like your photographs to look/how you will set up your shoot, so consider drawing sketches, photographing them and inserting them as 'images' on your site. Take a look at the handouts and examples of plans below to help you.
Task 2: Add your shoot plan to your site as an image.
Lesson 3
As part of your research, you should take a look at the work of the artists you have chosen to be influenced by and create your own visual responses to their work. This process allows you to better understand the techniques they use and how their work is made which is knowledge that you can take forward with you into the rest of your project.
Task 1: Green (grade 1-3) Complete one shoot where you take 8 photographs recreating the style of your chosen artist. Amber (grade 4-5) Complete one shootwhere you take at least 12 photographs which you will later edit to create your artist response. - Consider how you will edit your photographs after you have taken them as this will change how you take them. - Also think about lighting, (time of day if using natural lighting) angles, the overall composition of your images, your choice of model, costume, props and background. - Ensure that all of your photographs are in focus, and have used camera settings appropriately.
Red (grades 6+) Amber + Take as many photographs as you wish. Variety is key. - Try to vary the angles from which you take your photographs, how close you are to your subject, which parts of the scene you are zooming in on etc. in each of your photos.
Lesson 4 & 5
Task 1: a) Add a title underneath your artist research of '(artists name) response contact sheet' b) Create a new folder in your Photography folder in your Google Drive with the title '(artists name) response contact sheet' and upload your photos to that folder. c) Upload your photographs in rows of four onto your site, screenshot the photos & upload your contact sheet as one image. If you completed the red task during your last lesson then try to be selective with the photographs which you choose to include. You should have at least 12 photos in total, but they should be your very best ones.
Task 2: Underneath your photos, annotate your shoot answering the following questions: - What did you do during the photo shoot? - How did you take your photos, what props/lighting did you use and why? - Did you create a mood/atmosphere through the facial expression/pose of your model? How? - What are the strengths of your photos and why? - If you were to complete your shoot again, what would you do differently to improve your shots?
Task 3: a) Pick your favourite images and edit using Affinity or by hand to resemble the work of your chosen photographer. The techniques you choose to use when doing this will depend entirely on the photographer you have chosen to research. b) Upload and present your edited responses underneath your contact sheet
Task 4: Green / Amber: Reflect on your response(s) using the sentence starters below (you don't have to use all of them, pick and choose the sentence starters which you feel are the most appropriate): For this response I took inspiration from (artist's name) by... I wanted to create a style of... by ... Other ways I could manipulate my photographs are by... To improve my edited image further I could... If I were to take (artist's name)'s style and interpret it in my own way I would...
Red (grades 6+): Reflect on your response(s) using the help sheet below as a guide for what to write.