It is important to look closely at the work of more than one artist during our projects, otherwise we run the risk of being influenced by only one source and our work may therefore not be personal or original when we come to develop our own ideas. Therefore, you will create a second artist research page and response with a different artist.
When you come to develop your own ideas later in the project you will need to be influenced by the work of all of the artists who you have researched - it is therefore important for you to think about how you might to combine elements of the artist who you research today with the artist you have previously researched, how will their visual styles and ideas fit together? If you are unsure, then you might like to choose a different artist.
Task 1: Take a look at your mood board from earlier in the project to help you decide on which artist you should research. Remember that the ideas you develop will need to be influenced by the work of all of the artists who you have researched so think about how you might combine the ideas of the artist you choose with those of the artist you have already researched. Top tip - try to pick artists whose subject matter, editing techniques, use of light etc. compliments each other so that you will be able to come up with ideas which relate to both artists easily later on in the project See the link below for a list of possible techniques you could pick from and consider how each technique could compliment the work of the artist you have already researched:
Task 2: Add a title of '(the name of your Artist)' to your site.
Task 3: Create an Artist Research page directly onto your site by following the steps below.
Green (grade 1-3) a) Find at least 3 images by your chosen photographer which relates to the theme of horror. b) Add your three photos underneath your title. Resize your photos so that they are of equal sizes beside each other. c) Copy and paste the sentence starters below underneath your three photos and then complete the sentences.
(Name of photographer) lived and worked in... (name of country).
They are best known for... (portrait/landscape/still life/photo collage - type of photography they are known for.)
I think the photographer has made the artwork by… (photoshop and write what tools might have been used, hand manipulation, collage etc.)
I believe the photographer wanted to explore… (possible ideas/reasons for making the art)
Three words I would use to describe the style of photography would be...
I like the photographers use of … (rule of thirds, leading lines, unusual angles, contrast, interesting lighting.)
Something else I like about the artwork is…
I will use the ideas/techniques (of…) in my own work by...
Amber (grade 4-5) Green + c) Look at the Julian Opie examples below or use the sentence starters below to help with what to write.
Paragraph 1 •Introduce the photographer – a brief biography – where they worked, what type of art they are known for. •(Name of photographer) is (nationality) but spent most of their life working in (another country or part of a country).
Paragraph 2 •Something I particularly like about the photographer’s work is … •I think the photographer’s work about…is interesting because…/they link to my project by… •The photographer uses ... (name the style or techniques) which I think will work with my idea of... •I am interested in their work from/on … because… •I learnt the photographer uses (give examples of materials/style / techniques) to communicate their ideas by…
Paragraph 3 - Analyse a particular artwork •The image (describe the position e.g top left) is about… • (Photographer's name) have used ..colour /line/ texture/ shape/space to create…/in this way because… •When I look at the work I can see…the mood suggests ... •The photography uses (note down the compositional guidelines that have been used) …makes the photograph really effective because… •At the time this work was made …(what was happening this might be historical (war), social (women’s rights) or cultural (interest in Japanese art) I think this impacted the type of art they made by… Paragraph 4 •Using (photographer name) style of …I want to explore… •I feel this photographer is relevant to my project because.. •I plan to use (name a technique or process photo collage, weaving, sewing, hand painting, slow shutter speeds) in the same way as my photographer and experiment with…(lighting, aperture, name of compositional guidelines) The ideas (what are they) behind the work interest me because… and I plan to…
Red (grades 6+) Use the writing guide and pick and mix visual language below to help you analyse your chosen artist's work, remember to include a detailed analysis of at least one of the photographs.
TIP - your writing must be in your own words, if you copy and paste from the internet then your work could be picked up for copyright infringement and your coursework could be discounted for the exam.
Lesson 2
Now that you have researched the work of your chosen artist you need to respond to their work by taking your own photographs. If you go on a shoot without having properly planned the photographs you plan to take you might not take the most successful photographs. You need to spend some time thinking about all the possibilities in terms of the equipment you'll need, the location you'll need to go to and what could potentially go wrong during your shoot. In other words, you need to create a photoshoot plan. Task 1: Take a look at the response below alongside the research page which goes with it to get an idea of how your responses could relate to the artists you've studied:
Research Page
Response
Task 2: a) Add a title to your site of '(artist's name) Photoshoot Plan' b) Underneath you can either copy & paste the sentence starters below into a text box or download the template, fill it in and upload it to your site.
Green (grade 1-3) Copy and paste and finish these sentences: • I will do the photoshoot…… (where and when) because………….. • The props I will need for this shoot are………. • The techniques I will use are……………. because………….. • The lighting will come from………… which will give me a mood of……….. • The dangers of this shoot may be……………. • My plans link to the photographer I have researched because.........
Amber/ Red 
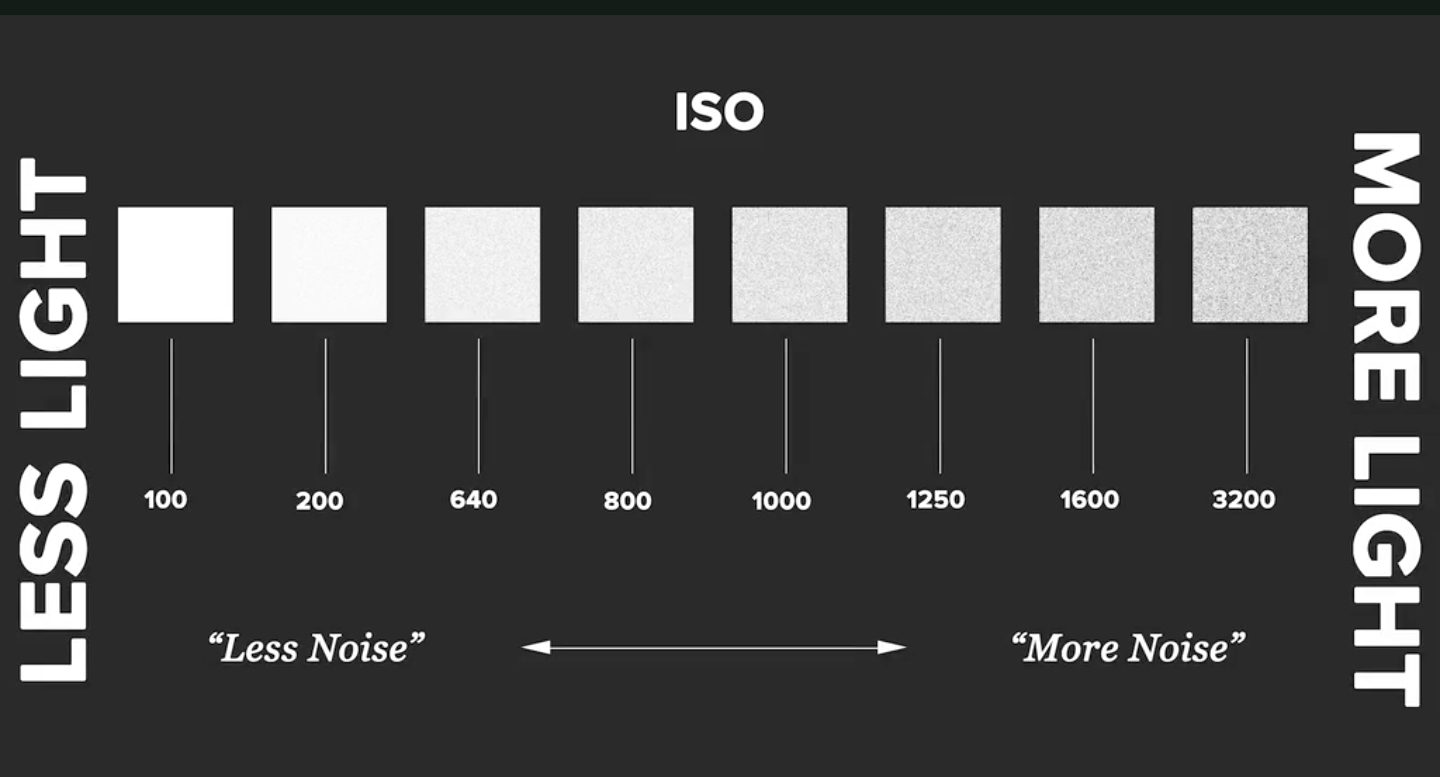
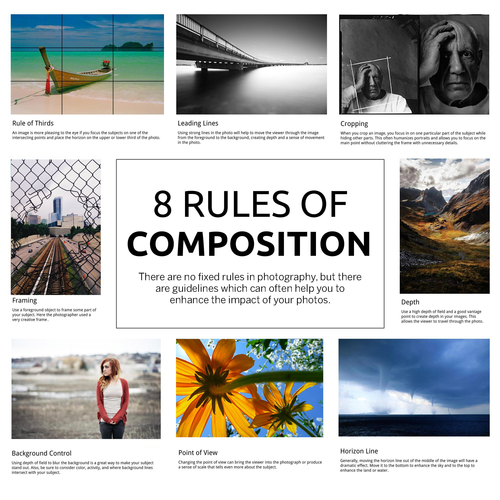
Ensure that you have included the information in the green task, in more detail and add extra information about: - Camera settings - Compositional guidelines
I plan to use...(name the camera settings) to create the effect of...
The compositional guidelines I am going to use are... because...
You get extra marks for including sketches of how you would like your photographs to look/how you will set up your shoot, so consider drawing sketches, photographing them and inserting them as 'images' on your site, as well. Take a look at the handouts and examples of plans below to help you.
Lesson 3
As part of your research, you will create your own visual responses to work of photographers you have chosen . This process allows you to better understand the techniques they use and how their work is made which is knowledge that you can take forward with you into the rest of your project. Task 1: Green (grade 1-3) Complete one shoot where you take 8 photographs recreating the style of your chosen artist.
Amber (grade 4-5) Complete one shootwhere you take at least 12 photographs which you will later edit to create your artist response. - Consider how you will edit your photographs after you have taken them as this will change how you take them. - Also think about lighting, (time of day if using natural lighting) or soft or hard light angles etc. - Consider your choice of model, costume, props and background. - Ensure that all of your photographs are in focus, and have used camera settings appropriately.
Red (grades 6+) Take 16+ images. Variety is key. Amber + - Use three or more compositional guidelines when composing your images. -Use two different backgrounds -Vary the angles you take your photographs, - Vary how close you are to your subject, which parts of the scene you are zooming in on etc.
Lesson 4
Task 1: a) Add a title underneath your artist research of '(Artists name) Response Contact Sheet' b) Create a new folder in your Photography folder in your documents with the title '(Artists name) Response Contact Sheet' and upload your photos to that folder. c) Then upload your photos to your Google Drive inside your Y10 Photo Folder d) Upload your photographs to your site in rows of four. Screenshot your contact sheet, delete the individual images & upload your screenshot. If you completed the red task during your last lesson then try to be selective with the photographs which you choose to include. You should have at least 12 photos in total, but they should be your very best ones. Task 2: Underneath your photos, annotate your shoot answering the following questions: - What did you do during the photo shoot? - How did you take your photos, what props/lighting/camera settings did you use and why? - Did you create a mood/atmosphere through the facial expression/pose of your model/lighting? How? - What are the strengths of your photos and why? - If you were to complete your shoot again, what would you do differently to improve your shots?
Task 3: a) Edit your photo(s) using either digital software and/or hand manipulation similar to your chosen artist. b) Upload and present your edited response underneath your contact sheet. Task 4: Green / Amber: Reflect on your response(s) using the sentence starters below (you don't have to use all of them, pick and choose the sentence starters which you feel are the most appropriate): For this response I took inspiration from (artist's name) by... I wanted to create a style of... by ... To improve my edited image further I could... If I were to take (artist's name)'s style and interpret it in my own way I might...
Red (grades 5+): Reflect on your response(s) using the sentence starters above and the help sheet below as a guide for what to write: